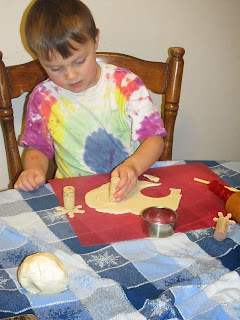
Last week we worked on these stamped salt dough ornaments. There are lots of different salt dough ornament ideas floating around on Pinterest these days, which inspired us to create up our own idea.
To begin with we used a basic salt dough recipe:
1 cup flour
1/2 cup salt
1/2 cup cold water
First I mixed the flour and salt together in a bowl, then added the water and stirred with a wooden spoon. Once it had formed into a ball I placed it onto the counter and kneaded it until is was fully blended and not lumpy. (It still feels kind of grainy to the touch.)
We used two kinds of stamps and presses. The first I made using small wooden snowflake cutouts which I hot glued to corks. I thought this would give some height off the dough so we only got the image and not marks from the sides.
In order to make our ornaments, I rolled the dough flat until it was about 1/4 inch thick. Big Brother then used one of our round biscuit cutters to cut out circles.
Next he pressed or stamped images into each circle. He liked experimenting with mixing different sizes on each ornament.
When he was done cutting and pressing, we baked the ornaments on a cookie sheet in a 250 degree (Fahrenheit) oven for about 2 hours. When they were done we had these creamy white snowflake ornaments.
The next day we decided to paint some of the baked ornaments. We used acrylic craft paints, including glitter acrylic paints which come from a Martha Stewart line sold at JoAnn Fabric Stores.
In the end we liked the glitter paints best as they were not too dense in color because they had more of a clear base. We also decided not to paint all of them, as we liked many of the ornaments plain.
We like giving each grandparent a handmade ornament every year, and we're considering using these this year. They also make nice add-ons to wrapped gifts. But, we still have some more fun, handmade projects to try out this week.
This post may also have been shared at some of these terrific link parties.


No comments:
Post a Comment