
Thursday, January 30, 2014
Love Bugs
We're getting closer to Valentine's Day, which is by far my favorite crafting holiday and I love sharing the fun with the boys. Big Brother is already getting excited by remembering some of last year's projects. We have several fun crafts planned for the next few weeks. We kicked off this year's Valentine's Day crafting with these egg carton "Love Bugs."
Tuesday, January 28, 2014
Arctic Sticky Collage
A few weeks ago we had a lot of fun with our Used Wrapping Paper Sticky Collage which we spontaneously put together. When a family member gave us a box of old National Geographic magazines I thought it would be fun to try a "themed" collage. As several of the magazines had polar animals, it seemed like it would be a good idea to try an arctic theme.

Monday, January 27, 2014
"Cold" Sparkle Snow Dough
A few weeks ago we made Sparkle Snow Dough which proved to be a lot of fun. Big Brother's only complaint was that it didn't seem "cold" like real snow. This lead to some searching on the internet and Pinterest which helped us to this recipe for Erupting Snow. Although there seemed to be similar recipes out there, this was a great fit. We're simply calling it "Cold Sparkle Snow Dough" here.

The ingredients are simple: shaving cream, glitter, and baking soda.
Friday, January 24, 2014
Creating Our Own Sibling Book
This month's Virtual Book Club for Kids author is Laura Numeroff, and although we love her well known books like If You Give a Mouse a Cookie, I knew this was the perfect opportunity to put together a project I've had in mind for a while.
In the fall when Big Brother started to show some sibling jealousy, I ordered a copy of What Brothers Do Best. We already had What Mommies Do Best/What Daddies Do Best in board book, but this quickly became a new favorite. We used it to talk a lot about ways their relationship was special and different from other relationships he had. We talked a lot about the things they already enjoyed together and things they could do together some day.
But, I knew Big Brother would like to take the book a little further, so we created our own "brother" book.
Monday, January 20, 2014
Double Chocolate Valentine's Popcorn
Yesterday (January 19) was National Popcorn Day, which inspired Big Brother and I to experiment with a new popcorn recipe ourselves. In order to get ready for Valentine's Day, we decided to try out a new recipe we might want to give some of our own sweet valentines.

We've made white chocolate popcorn before, but decided this time to add in a semi-sweet chocolate element too.
Thursday, January 16, 2014
A Boy, Some Stickers, and A Box
The other day I was all set to explore a new project; using our window snowflakes, colored construction paper, and white crayons to create snowflake rubbings.
Except, Big Brother was not at all interested in the materials I laid out, even after I experimented myself.
 He was too busy working on his box.
Last Saturday, as my husband was gathering the recycling Big Brother claimed a medium sized packaging box which had arrived over the holidays. On his own he began turning his box into a "rocket ship." He raided his art bin, collecting a box of markers and a bag of stickers.
He then proceeded to work, and work, and play, and work on his box. The design, the art work, the concept was all his own. He was completely engaged for large chunks of time. At the time of these photos he had invested over three hours of time into the box between creating and play over a three day period. And he was still going!

And it will continue to hang around, until Big Brother loses interest and is ready to move on. Until then, we can expect to see this boy in his box several more times.

Except, Big Brother was not at all interested in the materials I laid out, even after I experimented myself.
He then proceeded to work, and work, and play, and work on his box. The design, the art work, the concept was all his own. He was completely engaged for large chunks of time. At the time of these photos he had invested over three hours of time into the box between creating and play over a three day period. And he was still going!
Moments like these serve as a good reminder to me that sometimes the best projects aren't planned. And often the best projects are led by a child's interest. Giving Big Brother the room to chose whatever materials interested him, and to create in whatever way he wanted, meant he was incredibly engaged with his project. It has also mattered to him that the box has been allowed to hang around the house much of the week, moving from room to room, with more and more additions. Its continued presence gives the project a sense of value to its creator.
And it will continue to hang around, until Big Brother loses interest and is ready to move on. Until then, we can expect to see this boy in his box several more times.
This post may also have been shared at some of these terrific link parties.
Tuesday, January 14, 2014
Ribbon Rings
Little Brother is an early walker; he's been walking since just before Thanksgiving which means that by this point in time he is really cruising. These days we're often looking for ways to entertain Little Brother as he only wants to be moving and can often find himself getting into things that we don't want him discovering.


I noticed the other day he liked dragging blankets behind himself and thought he might find something with ribbons fun to pull. Today as I watched him play with some mason jar lid bands, I realized they were the perfect thing to tie ribbons to.
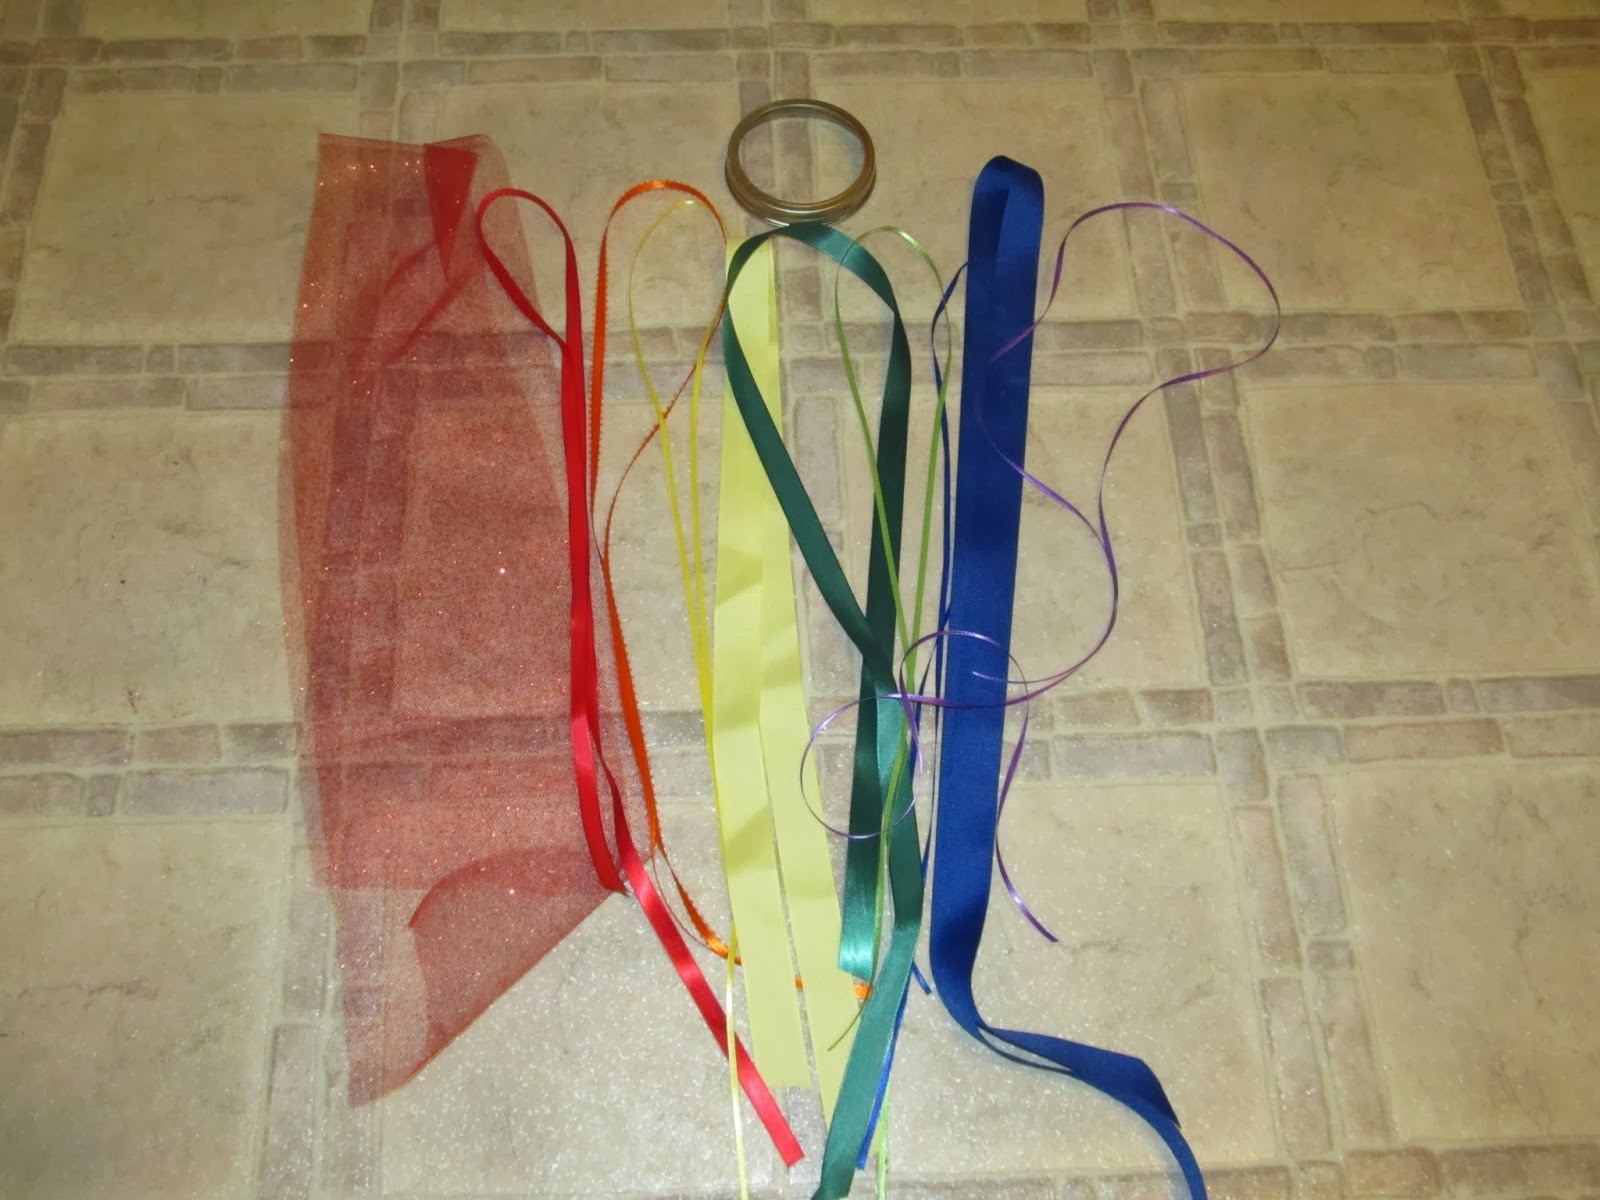 |
| Materials include four to a dozen pieces of ribbon, at least a 18 inches long each, and mason jar bands. (I used wide mouth bands.) |
At first I just used some ribbon scraps. I folded each piece in half and looped it through itself around the ring. After I completed the loop, I again tied the ribbon on the outside of the ring.

After I made a few rings with scraps, I couldn't resist making a "rainbow ring" with new pieces of ribbon. In the end we had three rings.


Little Brother did enjoy walking around the with the rings, dragging them, and even trying to put it on his head like a hat.

Big Brother also couldn't resist the ribbon rings, which is why we made more than one. He decided to start a dance party with the rings.

By the end of the evening, they were hanging on our bedroom door knobs awaiting some more fun tomorrow.

On a side note, you've probably noticed that for the past month Little Brother has a large band-aid on his forehead in most of our posts. Unfortunately, as a casualty of being an early walker, he took a spill into a hard object and needed to get stitches, twice. Although the stitches are out, the cut is still healing and the tumbles still happening, so we've decided it's just safer to keep it covered. We're looking forward to some pictures without the bandages soon.

On a side note, you've probably noticed that for the past month Little Brother has a large band-aid on his forehead in most of our posts. Unfortunately, as a casualty of being an early walker, he took a spill into a hard object and needed to get stitches, twice. Although the stitches are out, the cut is still healing and the tumbles still happening, so we've decided it's just safer to keep it covered. We're looking forward to some pictures without the bandages soon.
This post may also have been shared at some of these terrific link parties.
Saturday, January 11, 2014
Sparkle Snow Dough
Today's rainy weather is definitely putting a damper on winter fun. No sledding, no snowman building, no using skates and snowshoes. So we decided we needed to bring some winter fun inside. I'd seen several recipes for "Cloud Dough" before and heard from other moms how fun it can be, so we decided to turn it into "Sparkle Cloud Snow Dough."

There are several different versions of cloud dough online. I went with a a flour based version. We tweaked amounts based on a couple of different recipes and added in glitter for a more wintery look.
Alphabet Adventures: S is for Santa and T is for Train
I can't believe it's taken me this long to type up our S & T Alphabet Adventure, but we did have the fun of the holidays to distract us.

This was a very special Alphabet Adventure for several reasons. The first reason being that the tickets were a holiday gift from a dear friend. But it was also special as we had never participated in this event before and it was, of course, all about creating some holiday magic for the whole family.
The event is officially a reenactment of the beloved book, and movie, The Polar Express, organized by a local Lions' Club, but we turned it into our adventure: S is for Santa and T is for Train.
The Adventure
A weekend blizzard turned our area into a winter wonderland which added to our excitement as we headed to the local train station. With the boys dressed in their Christmas pajamas we couldn't wait to see how this adventure would turn out. Once there we picked up our golden tickets and waited to board the train car.
The tickets, the snow, the holiday music playing in the background, and the festive volunteers all added to the magical feeling of taking a ride to the North Pole.
Once on the train we were served hot chocolate and cookies by waitstaff dressed in white shirts and white hats. The hot chocolate was just the right temperature and the cookies perfectly crisp.
Progressing through the snowy woods along the frozen river it really did feel as though we were headed to Santa's home.
As we traveled there were several other nice elements the volunteers had created for all the passengers: a reading of the book, a group sing along, music from the movie soundtrack playing, and overall cheer from everyone.
Soon we arrived at the station currently known as the "North Pole." Elves waved happily from the platform and we were quickly informed that Santa had boarded the train!
Big Brother was the first in our car to receive the "first gift of Christmas," a silver bell with a cheery jingle. He was too excited with his bell to capture a moment of it being held still.
Although we had read the book before going on the adventure, we reread it when we got home to relive the fun of our own ride on The Polar Express.
The Projects
In the bustle of the holidays we kept our projects simple.
S is for Snowflake
We used our snowflake stamp and colorful ink to create a collection of snowflakes on our "S" page.
T is for Tree
We took a small trimming off our tree and used it as a paint brush on our "T" page.
Although it's taken a while to post, it was a very memorable Alphabet Adventure. And although we've headed into the New Year, we're still planning on wrapping up our Alphabet Adventure series.
Other S Adventure ideas: seacoast, sundae shop, shopping, swamp, submarine museum, skiing, swimming, or snowshoeing.
Other T Adventure ideas: tea party, train station, or toy museum.
This post may also have been shared at some of these terrific link parties.
Monday, January 6, 2014
Used Wrapping Paper Sticky Collage
So after two great weeks of vacation we were ready to head back into routine today, except we wound up with a rainy "snow day." Most of the day we were happily entertained with books, board and card games, a special lunch, and an Eric Carle movie on Netflix. That was until late afternoon when we were still stuck inside and needed something new to entertain us.

Over the holidays I had saved some used wrapping paper for future projects. I'd seen sticky paper collages online before and decided we'd combine the two.
The materials are simple: a large sheet of contact paper (we used a sheet of solid white contact paper as it was what we had,) and used wrapping materials. I cut up small squares of paper and strips of used ribbon. I also put out different scissors and shape punches. Big Brother was interested before I could even take a material picture.
Big Brother helped me peel apart the contact paper and we used tape to attach it to the wall sticky side out. Now the fun began. Big Brother cut up pieces of paper and strips of ribbon and stuck them onto the wall. Little Brother got interested too.
In fact, Little Brother thought it was great fun!
In the end, Little Brother thought it was more fun to remove things from the collage so we created him his own collage with removable pieces so he could leave Big Brother's work alone.
Both kiddos were entertained by the project, although Big Brother obviously stuck with it longer. He even came back to it a couple of times, so we're leaving the materials out over night for more play tomorrow.
This post may also have been shared at some of these terrific link parties.
Thursday, January 2, 2014
Potato Print Snowmen
Our holidays are almost over, and with those coming to a close it's a good time to send our "Thank You" notes. As a child my grandmother used to remind me she needed a thank you note for gifts, and I'm trying to instill that in my own children. In this electronic age there is something nice about sending and receiving paper notes. As Big Brother is too little to write yet, I like to have him make the cards themselves.

We've been reading several different snowmen books this week so we decided to create snowmen thank you cards using potatoes prints. We cut one potato into several pieces. The top piece became the head, a middle piece the middle, and the bottom became the base of the snowmen. We also cut another middle piece into the shape of a hat.


We've been reading several different snowmen books this week so we decided to create snowmen thank you cards using potatoes prints. We cut one potato into several pieces. The top piece became the head, a middle piece the middle, and the bottom became the base of the snowmen. We also cut another middle piece into the shape of a hat.

We stamped the potatoes onto folded, colored card stock using washable poster paint. Some of the cards opened like a book, and others opened from the bottom up. We found the darker paper showed off our snowmen better.

After stamping we let the paint dry for several hours.

When the paint was dry we used colorful sharpie markers to add on some details like eyes, a nose, a mouth, buttons, and arms.

When we were finished we had a collection of unique, individualized snowmen cards. I made a set as well to use when writing thank you notes to my students for their gifts.

Although we made our snowmen into thank you cards, you could print these snowmen on to a lot of different things including collages, wrapping paper, paper bags, etc.
What fun ways do you create thank you cards with your kids?
This post may also have been shared at some of these terrific link parties.
Subscribe to:
Posts (Atom)