UA-52744532-1

Thursday, May 30, 2013

Virtual Book Club: "Swimmy" Sponge Painting

A few months ago I discovered the Virtual Book Club for Kids on facebook and pinterest. We used some of the ideas I saw for celebrating Dr. Seuss' birthday and creating activities to do with David Shannon books. This month's author was Leo Lionni.


For our first Leo Lionni book we decided to read Swimmy. Swimmy tells the tale of a little black fish who finds the courage to explore his world. He then uses his bravery and clever thinking to encourage a school of fish to work together so they too can explore the ocean. Big Brother was really interested in the creatures Swimmy meets along his journey but he wasn't sure what they all were. We did a quick search on YouTube to look for videos of the creatures. We loved seeing some of the amazing underwater videos of jellyfish, tuna fish, eels, schools of fish, and lobsters.

In this book Leo Lionni used several different materials to paint and print the illustrations. For our project we sponge painted ocean scenes. Before the project I cut several sponges into different shapes. Some shapes were recognizable, for example the fish shape, but others were generic like the half circle and rectangle.
Material notes: For the sponge painting we needed lots of flat surfaces or trays for the paint.  We used the lids of strawberry containers. We also kept a bowl of water for rinsing the sponges in between colors. 

Monday, May 27, 2013

Salamanders!

One great thing about rainy days is that it brings out the salamanders. As we had a lot of rainy days last week it proved a perfect time to go on a salamander search in the woods. I've loved searching for salamanders since I was a kid; my brother and I used to go together, combing our driveway after storms. And even now, whenever I run after a rainy spell I always stop along my way to move these little, orange creatures off of the road. But what was really special last week is we could do our search as a whole family.

First we read one of my favorite books for connecting kids to nature, called The Salamander Room by Anne Mazer.

Friday, May 24, 2013

Rocky Road Brownies

I discovered an amazing new brownie recipe today. So good, I made them twice. Yes, twice. In one day.

I wanted to give a thank you gift to a friend who loves brownies. And although I've developed a pretty good brownie recipe over the years I wanted to make something special. I was thinking about creating something like a "s'mores brownie" to go along with this coming weekend's theme of kicking off summer when I stumbled across this recipe for Rocky Road Brownies. A few tweaks, some time in the oven, and these brownies looked and smelled amazing. So amazing, that after they'd been delivered I knew I had to make a batch for us to try as well. Hence, two batches in one day. Our batch didn't let us down; this chocolate, gooey, nutty treat is perfect for a rainy day (or really any day.)

I didn't really plan to post the recipe today, so please excuse the lack of "how to" pictures.


Rocky Road Brownies

Ingredients:

1 stick of unsalted butter (plus a little extra for buttering the pan)
1 bag (12 oz.) of semisweet chocolate chips ( I used Ghirardelli chips)
2 large eggs
1/2 tsp salt
1/2 cup granulated sugar
1/2 cup packed light-brown sugar
1 tsp vanilla
3/4 cup flour
1 cup mini-marshmallows
3/4 cup chopped walnuts


Directions:

1. Preheat the oven to 350 degrees. Butter an 8 x 8 pan and then line with parchment paper, leaving an overhang on the sides. Butter the paper as well. 
2. In a microwave safe bowl melt the stick of unsalted butter and 1 cup of the semisweet chips. (It's easy to burn the chocolate so I recommend melting the butter and chocolate in small increments and then stirring. I melted for 45 seconds, stirred, and then for another 45 seconds.) 
3. After the chocolate is melted add in the eggs and salt, stir until combined. 
4. Stir in the sugars and vanilla. 
5. Add the flour and stir until just combined. Pour into the prepared pan. 
6. Bake on the middle rack for 30 minutes. 
7. Remove the brownies from the oven and immediately sprinkle the remaining chocolate chips onto the top of the brownies. Sprinkle the chopped walnuts and marshmallows on top of the chocolate chips. 
8. Put the brownies back in the oven and bake for another 5 to 7 minutes until the marshmallows begin to toast. 
9. Cool in the pan on a wire rack for at least 10 minutes. Carefully use the extra parchment paper to lift the brownies out of the pan and onto the wire rack. Continue to let the brownies cool until the topping seems to hold together when gently touched with a finger. (Probably about another half hour at least.)
10. Cut the brownies up and enjoy!


Wednesday, May 22, 2013

Creating and Using an Observation Journal

So several weeks ago we posted the exciting news of discovering a robin's nest with an egg just below our deck. (See Rockin' Robin Footprints). Over the following few days two more eggs appeared in the nest. We've been eagerly keeping an eye on the nest and we're excited to discover the eggs had hatched late last week. A quick google search helped me figure out it should be about two weeks before these little hatchlings grow enough to leave the nest.

Developing observation skills in children helps them learn to pay attention to detail in a variety of realms and encourages them to use different senses. Observation is a fundamental building stone to other scientific skills. It involves collecting and organizing information and leads to creating questions. Children learn to use a variety of strategies to answer these questions, such as inferencing and more observations. The baby robins under our deck are a perfect opportunity to purposefully practice observing how something grows and changes. (I say purposeful because most parents innately are building these skills every day with their child. Just think about how long a walk can take with a preschooler, how many things they notice as you walk, and how many questions you answer.)

In order to capture his observations I decided to create Big Brother a journal to use for the next few weeks. I used our word processing program and some free clip art I downloaded off of the internet. I know he won't want to draw in his journal every day for two weeks, so I made pages for 8 days of observations.

I printed the pages onto card stock, hole punched them, and then bound the pages together with binder rings. I added a set of colored pencils and put both into a ziploc bag to create a science kit. 

On the first page Big Brother drew what the nest looked like before the eggs had hatched. Younger children, like Big Brother, may need help observing by an adult prompting them with questions. I prompted him to think about the shape of the nest. He found brown and blue pencils. I had thought I might need to prompt him but he was already thinking about the colors on his own.

He then went back to the nest to check on the baby birds. I prompted him with the question "What do you notice?" He told me there were three, they were light brown, and they had "pricklies" on their heads. I also asked him to tell me what body parts they had. He informed me they had beaks and no wings. (Just in case you're wondering, they do have wings, they just don't look like wings to him yet.)

He drew three circles and some lines coming off as his "pricklies." (The pricklies are the beginnings of feathers.) I dated the page and wrote his observation at the top of the page.

Although he is looking at the birds multiple times a day we are not drawing them every day. He's attempting to capture the changes with his drawings and making some great observations orally. Although we're unique in being able to have a nest of baby robin's to observe, a journal like this could be used in a variety of contexts. Spring is all about growth and change, from planting gardens to changing trees to weather changes on a daily basis. So spring can also be all about observation. 


Monday, May 20, 2013

Simple Joys of Splatter Paint

I still remember discovering the joys of splatter painting. I have a distinct memory of being in the painting corner of my playschool center and experimenting with splattering paint onto paper clipped to an easel. I loved seeing the different shaped blobs and noticing when colors overlapped. I also remember being encouraged later on to not splatter paint quite as much.

This week's forecast looks pretty rainy and splatter painting seemed like a great connection to rainy days. There's something about the way the paint drips across paper that reminds me of rain splashing against windowpanes. And although I figured it could create a mess, I couldn't wait to introduce Big Brother to the joys of splatter painting.

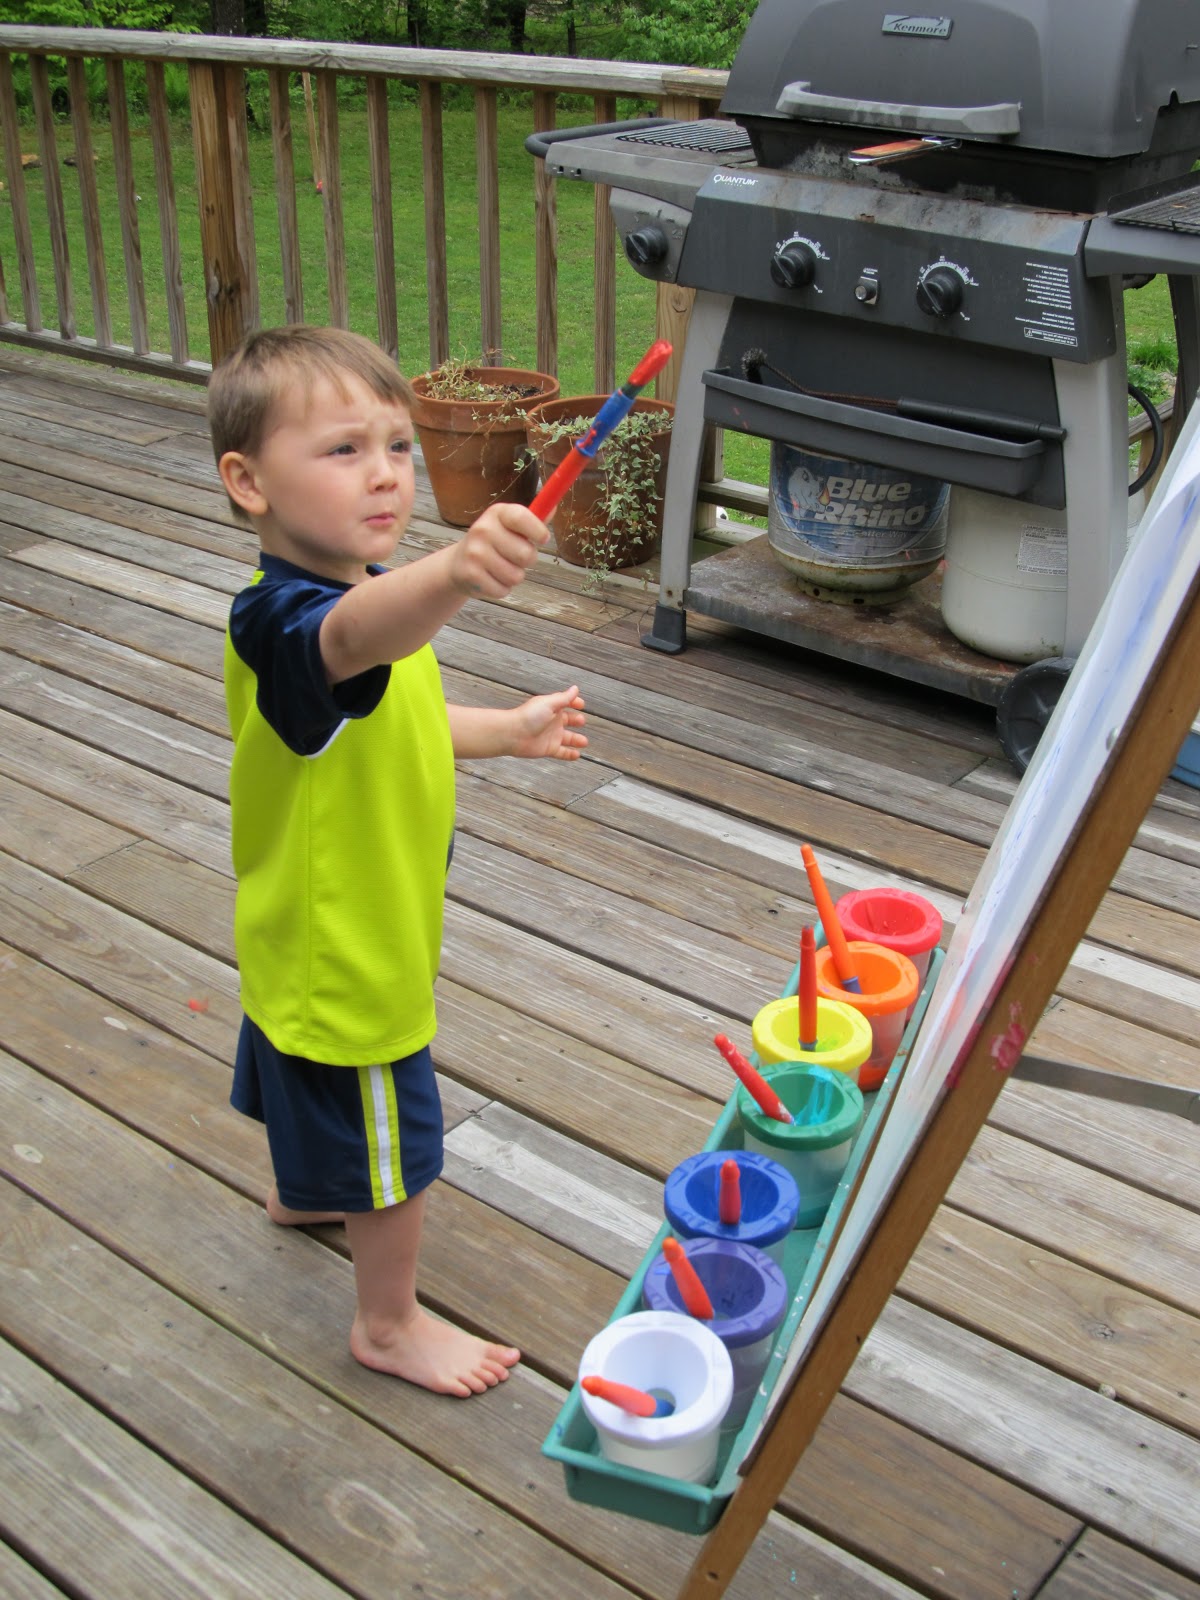
The materials are simple: paint, paper, and brushes. I scored these great paint containers with lids at a yard sale a few weeks ago, but any kind of container can be used. And we added to our paint color selection over the weekend, so we were excited to use purple and orange. But again, any range of colors can be splatter painted with. (I did use washable paints, because I knew we were going to get it on more surfaces than the paper.)


We read a cute book based on the traditional rhyme "Rain, rain, go away" which featured a lot of umbrellas. So I used a fine point sharpie marker to draw umbrellas onto the paper. 

I was planning on setting the painting up on the kitchen floor, and planned to just clean up A LOT afterwards, but the rain cleared up and we were able to head out on the deck. 
We found this easel in good shape in a "free" pile at the end of a road. It makes a great deck toy, as we already had an easel mounted in the living room. We always keep our eyes out for deals.

And now to begin splatter painting. I modeled how to splatter the paint and Big Brother's response was . . . 
"I don't want to splatter paint, I just want to paint." 
Bummer. 
But in an effort to encourage his own creativity I decided to let it go. (Despite being a mildly heartbroken mama who thought she was showing her high energy boy his soon to be favorite thing.) 

But then after some painting, 
on his own whim, he decided to give it a try. 
(I promise I didn't bribe him with chocolate, although I freely admit to using that in other situations like trying new foods and posing for a family photo.)

He really got into when he discovered the paint didn't just go onto the painting, it could fly in lots of directions. It was particularly amusing to us both when a huge blob of blue landed 10 feet away in the garden. Good thing it's washable. 

Little Brother watched from his seat, and yup, he even got a little paint on him. 

Big Brother experimented with different arcs and ranges of closeness. And he still did a lot of "smearing" after he'd splattered. 

Despite his initial resistance he enjoyed it. And I of course had to get in there and experiment a little too . . . together it was a lot of fun for this rainy morning. 
The last splatter painted umbrella of the morning. 


Saturday, May 18, 2013

Fabric Fun Box

A sweet little friend of ours turned 1 this week. Last week during a play date I noticed how much she liked taking things in and out of containers. It reminded me of a link I had seen a while back on how to make a baby toy out of a wipe container and fabric scraps. I decided to make one for her birthday. I knew I had a great collection of fabric scraps from a project I'd done as a preschool teacher over 8 years ago. (I rarely throw anything out . . . just ask my husband.)

Materials included fabric scraps, white contact paper, permanent markers, an empty wipe box, regular scissors, and pinking shears. A Huggies Box works well because the opening is soft and easy for little hands to slip into. 

I wanted to personalize it for her so I decided to cover the box with white contact paper. I cut two strips each four inches wide. 

I peeled off the paper and wrapped one strip around the front on the box and the sides. I chose to trim the paper while it was on the box, but it could be traced beforehand. I then cut the other strip in half and covered the back of the box.  

I added some garden designs, and later added her name, with permanent marker. 

Next I cut the scraps with the pinking shears. I cut each piece to be slightly larger than a DVD case. I used the pinking shears with the hope it would decrease fraying. 
There were about 15 rectangles all together. The fabric rectangles folded into the box neatly. 

The box was ready for playing. Now there can be lots of pulling out, putting back in, and lid opening. I can't wait to hear how she enjoys it!


Friday, May 17, 2013

Teacher Appreciation Sunflowers

These days Pinterest is filled with teacher appreciation gift ideas as both kids and adults are wrapping up the school year. As a teacher, I've always liked when I can see that kids have either had a part in picking or creating a gift. I try to do that for my son's teachers. We choose to celebrate his teachers on National Provider Appreciation Day, which usually is the Friday before Mother's Day.

This year because we were already painting pots for Mother's Day (see  Mother's Day Flower Pots) I decided to have him also create a flower pot for his children's center. We started in a similar way to the Mother's Day pots.

This time he picked several colors to paint the top rim. 


I wanted to play on the name of his center, Little Feet, so we painted just his feet to look like they were in the garden and added flowers on the bottom. 

But instead of fresh flowers, there needed to be something in the pot for each individual teacher. I was inspired by tubes of chocolate covered sunflower seeds in the check out aisle of the craft store and knew we could turn those into a cute sunflower themed gift. 

Materials included: chocolate coated sunflower seeds, yellow card stock, white glue, green pipe cleaners, green ribbon, plain sunflower seeds, and yellow cupcake liners. I used my scrapbook cutting system to create circles out of the darker yellow scrapbook paper, 
but I often just trace an upside down glass or mug for circles. 

First Big Brother cut slits in the cupcake liners. 
He needed help with this as he's still learning the correct way to hold and use scissors. I had him sit in my lap so I could guide him with my hands and we pretended they were "alligators" opening and closing their mouths. This seemed to help him think about how the tools worked. 
 After cutting the slits in the liners, Big Brother glued the liners onto the card stock circles so that the yellow side was up. He then added on the sunflower seeds with more glue.

I created quick gift tags using the lighter yellow card stock and a very fine point sharpie marker. I had Big Brother tell me something he liked about each teacher and something he wanted to thank them for. We wrote this on the back of the cards. 

After the glue had dried we taped a pipe cleaner to the back of the sunflower head and wrapped it around the tube. (We added a small "bubble" of tape to the back of the flower to keep the sunflower on the tube.) We tied the card on with the ribbon. 

All of the "flowers" went into the pot with some floral rocks in the bottom to help the tubes stay upright. 

Big Brother ready to deliver the plant pot and flowers. 

Big Brother took a lot of pride in this project and couldn't wait to share it with his teachers. He has been at his center since he was 6 months old. Although he currently is only there two days a week, he loves the center and teachers and has always felt supported by them. It takes a lot of trust to leave your little ones somewhere and we greatly appreciate the care his teachers have always given him. 


Wednesday, May 15, 2013

Chocolate Cake Playdough

Big Brother on his third birthday. 
One of the things I am loving about Big Brother being 3 years old is the more complex pretend play he's been engaged in lately. One of his favorite things to play is "birthday party." We've especially been doing a lot of birthday party play since his birthday last month. Whenever we play it is always a different family member's birthday, they always get some imaginary presents, and there is always a cake.

I wanted to further encourage this play by creating some kind of way for him to actually make the cake. We both love chocolate cake, and what we both request for our birthdays, so I decided to search the internet to see if there was a good recipe for chocolate scented playdough. I quickly came across this recipe at I Can Teach My Child. I wanted to make sure we liked it, so I decided to halve the recipe in case it wasn't a hit. It made plenty for the play we had in mind.


Tuesday, May 14, 2013

Mother's Day Flower Pots

Big Brother choosing flowers based on the colors
he thought each grandmother would like.
Last week we had two special projects to do; one was for the three grandmothers in honor of Mother's Day and the other was for Big Brother's daycare teachers. All three of our grandmothers enjoy plants so we decided to paint plant pots and then pick a special flower for each one to enjoy this coming summer. The pots took several days to complete, as there were three to do and lots of steps. It was easier to break it down this way than risk smearing paint and overwhelming the artists.

I had an idea in mind and the pots needed to be tall enough to fit Big Brother's handprint on the sides of the pot. On the bottom part of the pot I wanted to print Big Brother's hands so they looked like a tall flower and Little Brother's feet so they looked like the leaves. We headed to our local general store which pretty much has everything, including an amazing array of terra cotta pots in stock year round, and found just the right size! We wanted to personalize the pots, so using scrapbook stickers we spelled their names out on the top edge. The idea was that when we were done we could peel off the stickers and have their names left on the pot. (See the end for a side note on this step.) I used blue painter's tape to mark off the edges so when Big Brother painted the top part he would stick to just the top edge. He dug through the acrylic paint bin and chose one color for each.


Big Brother then painted the tops. He painted over the stickers. 


We did the next step the following day. Again using craft acrylic paint we painted Big Brother's hands and made prints on the sides of the pots. We set up a bowl of soapy, warm water and rags for washing hands in between prints.

It was a lot of handprints, which did get a little tiring for Big Brother, so his reward was getting to paint my hand. 

We again waited another day, and this time I painted Little Brother's feet and added his prints to the bottom edges of Big Brother's hand prints. I added some other garden details at the same time by painting freehand. When that layer had dried, Big Brother used his fingertips and paint to make small flowers in the grass. Our garden look was coming together. I also added the boy's names and the year to the bottom of each pot with permanent marker. 


When everything had dried, each pot was sprayed with a clear, acrylic spray paint to help the painting stay on a little longer. Whenever you paint a terra cotta pot you intend to use for plants you risk the paint wearing off. Terra cotta sucks up moisture which can eventually peel off the paint. The spray will hopefully seal out some of the moisture although it won't protect from all of it. (See below for a side note on the spray.) 

A few shots of our handprint/footprint garden themed pots. 

On Saturday I quickly planted our pots with the plants Big Brother had chosen. Ideally I would have had him do the planting but I wound up needing to finish the project while he was out of the house. They were ready to deliver for the weekend's festivities and well received! 


A few side notes about materials: 
1) The stickers did not peel off that easily in the end and I wound up needing to use an Exacto knife and fingernail polish remover to remove all of the residue. Both were tricky as I didn't want to remove the paint. I like the look using the stickers gave but will try other stickers next time. 
2) The acrylic spray was very strong smelling and I did not do this near the boys or let them participate in the spraying. It must be done in a well ventilated area by an adult. I would recommend doing it outside, I did it in the basement with the doors open and it was still too much enclosed to truly get rid of the fumes. 


Saturday, May 11, 2013

Creating a Family Garden

My Mother's Garden, Summer 2008
When I was growing up my mother always had a pretty amazing garden. Some of my earliest memories of being outside revolve around the garden; playing around the edges while she worked or my bare feet in the soft, carefully turned dirt. I can remember exploring it with my brother while searching for summer snacks. Crunchy green beans and juicy tomatoes always taste better when you eat them still standing in a garden. At the end of the summer our kitchen would smell incredible as my mom prepped the food, canning and freezing it so we could enjoy it throughout the winter.

Daddy adding all sorts of good growing "stuff"
into the soil; including composted cow manure,
limestone, green sand, and rock phosphate.
Unfortunately, as much as I love gardens and fresh veggies, I never inherited my mother's green thumb. I'm not always the greatest at keeping plants watered or getting the most from them. I continued to get my vegetables from her garden until a few years ago, when I realized I probably better be a little more grown up and get them from a local CSA farm share. Each summer season we love getting a weekly basket of fresh, in season vegetables from our favorite local farm. We're counting down the weeks until we get to pick up our first selections this year.

But now that Big Brother is getting a little older, I really wanted our children to experience having a family garden. I want them not only to experience the fun of eating from the garden, but also to develop the respect of watching something grow from a seed to a full sized plant and to understand the care and process that goes into growing food. So we decided to expand our small, mostly herbs and tomatoes, raised bed into an even larger raised bed this year. And luckily, I can still ask my mom all sorts of questions as we embark on this new project.

Our picture lists of seedlings we wanted to buy. 
During the course of the week we read several children's books about gardening. Two of my favorites include The Vegetables We Eat by Gail Gibbons and This Year's Garden by Cynthia Rylant. After reading both books Big Brother and I talked about what he would like to grow and then made a picture list to take to the farm stand. (We'd already purchased some seeds over the weekend.) All together we decided we would grow pumpkins, cucumbers, peas, green beans, carrots, celery, peppers, and tomatoes. As we're still getting our CSA share this year, we don't need to grow enough to support our family but we'll be able to supplement what we receive.

We had a lot of fun selecting things at the farm stand. When we got there I realized our list might not help us that much, as the plants obviously didn't have vegetables yet. But Big Brother solved that problem by looking at the seedling labels. He was especially excited to discover purple peppers!


A few days after purchasing the seedlings, we were ready to plant the garden. We made it a whole family affair, and waited for Daddy to come home from work. In terms of planting the seeds, one way we got Big Brother to gently and carefully plant them was to say "Goodnight seeds, we'll see you again when you're a plant." He loved saying that as he patted the dirt. He also understood the seedlings were "baby plants" and he needed to be gentle with them. He enjoyed using his gardening tools, a birthday present, to dig small holes. 


Each day since we planted Big Brother likes to look out over the garden and see how things are growing. I can't wait for the first moment he discovers something ready for picking on one of our plants. Until then, I need to convince him weeding is fun.