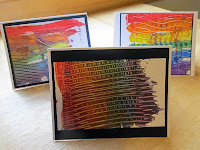
 Although lately I've been letting our projects be more about the process there still come times where I want to turn these projects into a specific product. So I love when both process and product become part of the experience.
We recently had that combination when creating thank you cards for my big guy's birthday presents. I had been eyeing the rainbow comb painting images I had been seeing on Pinterest, and grabbed a big package of combs at the dollar store about a month ago. One dreary afternoon last week when it was still too chilly for Little Brother outside, and therefore we were all stuck in the house, we pulled out the paint and combs and gave it a try.
It was a huge hit with Big Brother. To start, I painted thick stripes of red, orange, yellow, green, blue, and purple paint onto white card stock. He then chose a comb from the set and began using it to draw lines through the paint. The package had a variety of comb tooth sizes which he quickly figured out. This allowed him to make different size "stripes" through the paint. As we made more he started doing the stripes himself. One of the reasons I had originally wanted to do this project was so we could begin to talk about the order of the colors of the rainbow and as we painted the stripes he began to call out the order.
In terms of process he loved dragging the comb through the paint and swirling it to mix the colors a little. We did way more than I originally expected and went on to experiment with some two color patterns as well.
But what about the product? Well, in the end I cut the images he had made into roughly 3" x 5" pieces. I then mounted the paintings onto blue scrapbook paper which I then glued to white card stock. This created the finished product of rainbow painted thank you cards. I always add the date, type of project, and the name of my little artist, so family members can know who it was by and how it was created. In the end, he loved the project and I was pleased with the final product, a perfect mix!


No comments:
Post a Comment